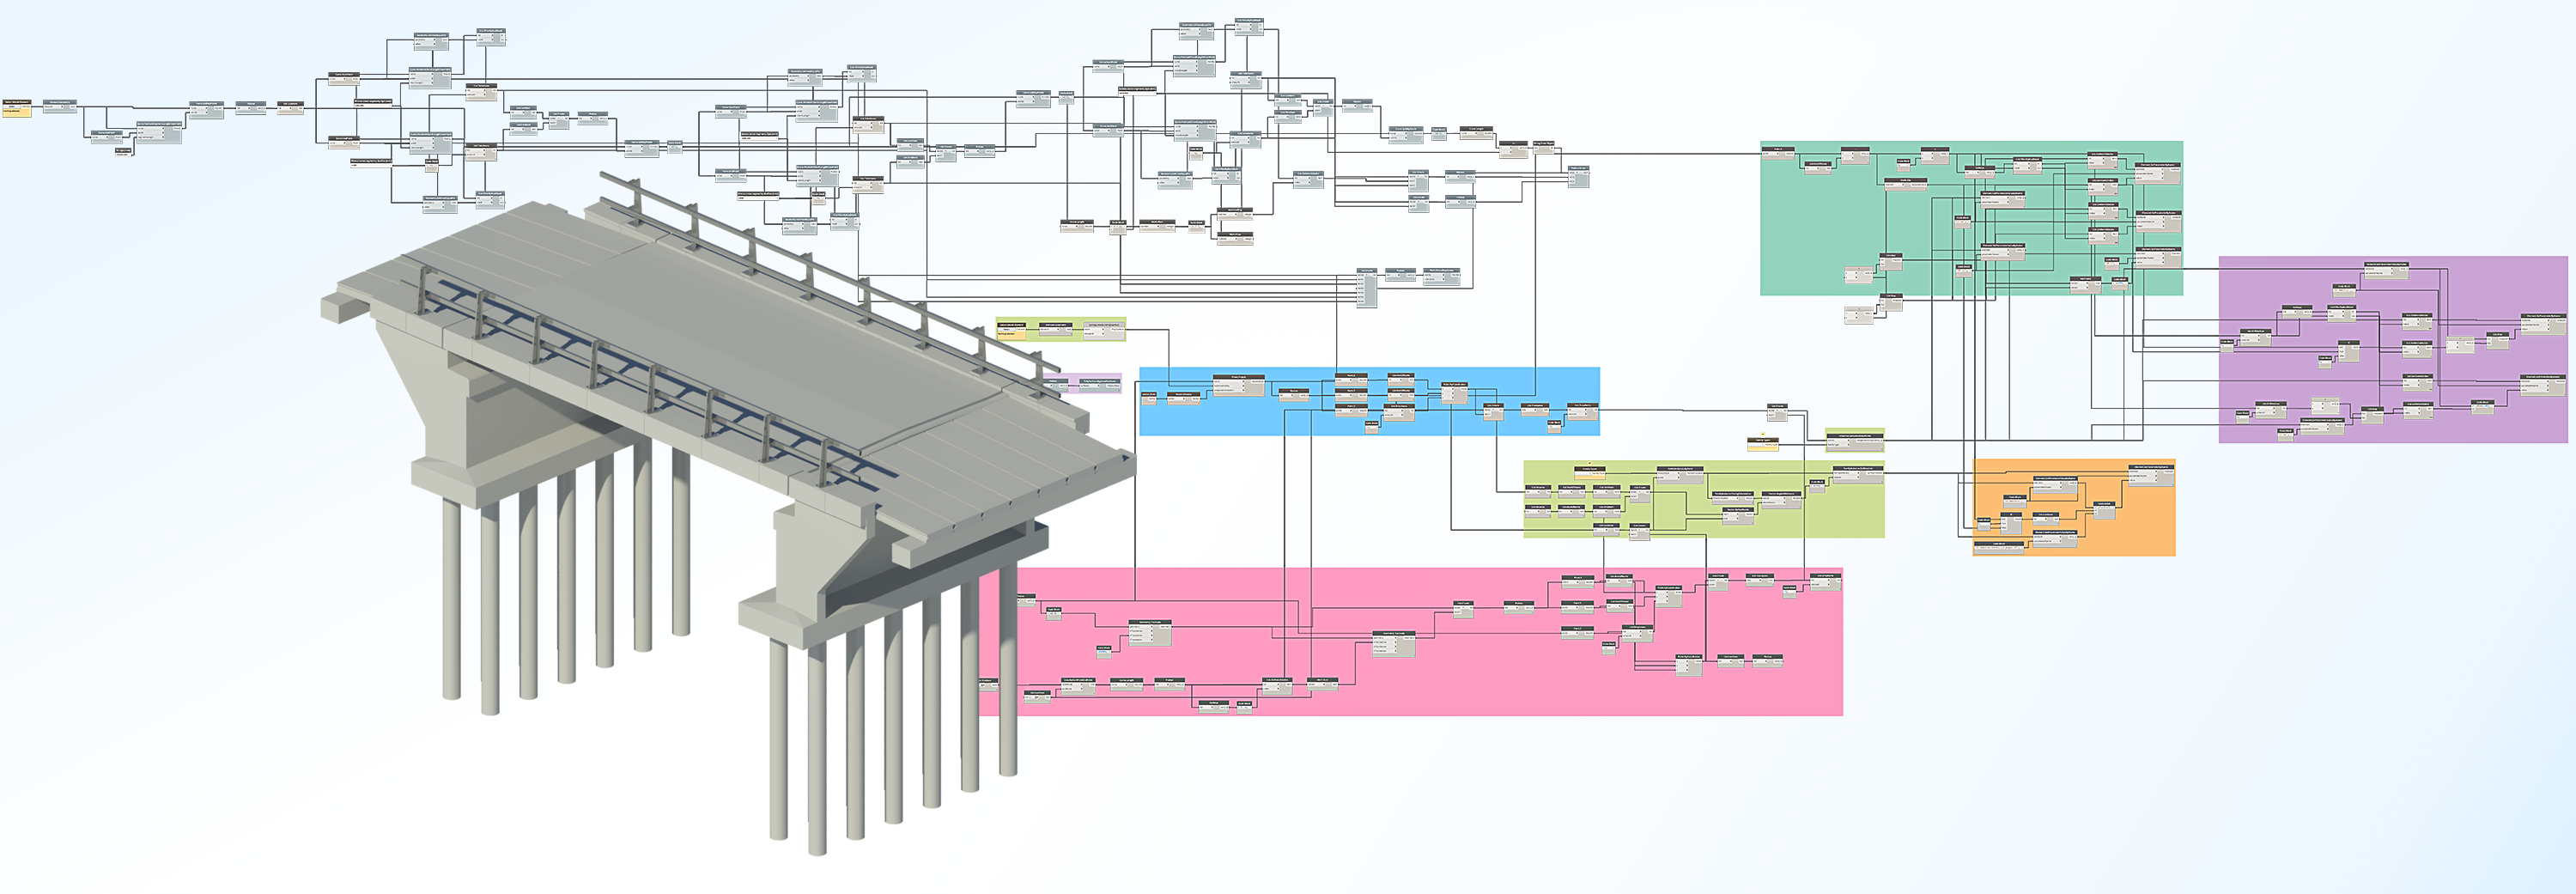
One of the points of BIM is to enable improved collaboration within the AEC sector. This collaboration is facilitated by numerous aspects, among which is the data and information exchange or in plain terms the sharing of BIM models with clients, contractors or subcontractors (or appointing and appointed parties for those keen on ISO 19650 terminology). While native Revit files can be exchanged if everyone is using the same software, it is rarely the case. Likely there will be multiple tools employed from competing software companies that have proprietary file formats not easily exchanged or that cannot be worked with by other BIM software at all. Even if all parties are on the same software platform, many companies may not be willing to openly share and thus unintentionally reveal their know-how or for whatever other reason.
To enable proper collaboration, a standard open BIM format has been created and has been around for quite a while – the IFC (Industry Foundation Classes) specification. With all due reservations, IFC file format is probably the best and most common option used to exchange BIM information and geometry data on projects. The use of this format for information exchange is required in an increasingly larger number of contracts worldwide. Not to say that it doesn’t have its own set of problems though.
With that brief introduction over, it is time to get on with the point of this article. When it comes to exporting IFC files from Revit, the results can be hit or miss. While it is impossible to cover everything related to Revit and IFC in a single article, we’d like to discuss one issue that can be solved very simply. The need to change the IFC classification for a single Revit family/element.
There is one very useful document floating around the internet, it’s the Revit IFC manual. It covers quite a few aspects about the IFC workflows within Revit and is a must-read for those dealing with IFC constantly. We’ve included several handy links at the end of this article, you can find the Revit IFC manual in Link 1, or just by googling it. It covers some features which are not otherwise well documented. Particularly when it comes to overriding IFC parameters such as class, type, name, etc.
Below we’ll discuss three easily available options to modify the IFC classifications, including the one provided in the Revit IFC manual.
1. Changing IFC export settings for Revit element categories
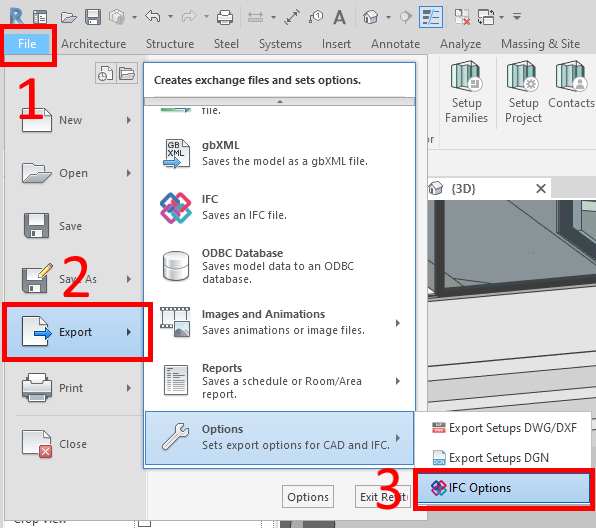
The first method requires the modification of the IFC export settings. This approach is quite straight forward but is limited to Revit element categories and subcategories. You can access these settings through the File > Export > Options > IFC Options. The present example is shown for Revit 2020. You can download the IFC exporter for your version of Revit through the Autodesk App Store just by searching for IFC 2018, 2019 etc.
This would bring up a menu with a list of all the Revit categories and subcategories with their assigned IFC Class and IFC Type parameters.
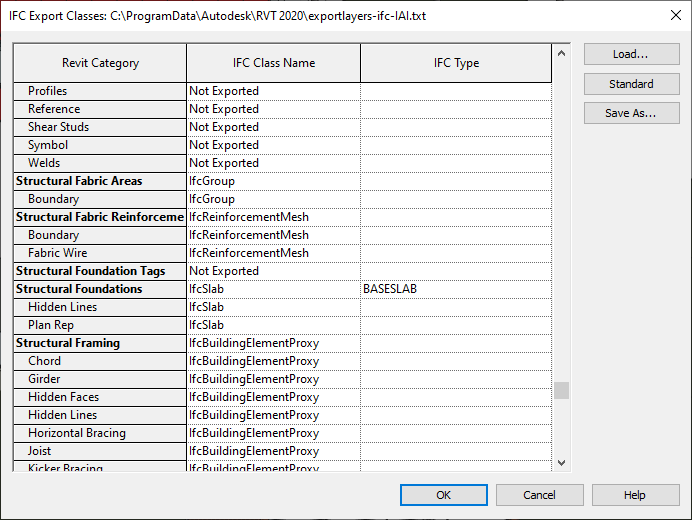
One important aspect is that it does not give you any lists to choose IFC classes, as all the fields are text fields. Meaning that you would have to enter the classification manually, therefore it is important to check the value text has correct spelling and has capitals where necessary. If you aren’t fully sure what classes exist or need to check the correct spelling, you can explorer Links 2 and Links 3 provided at the end for the IFC2X3 TC1 and IFC4.1 specification. On a side note, at present, Revit is still listed as “in progress” under the IFC4 certification on the buildingsmart.org website (Link 4), and that does reflect the experience of some users that IFC2x3 works better with Revit at present. Autodesk lists their supported classes for Revit on their knowledge network (Link 5).
2. Changing IFC class manually through the IfcExportAs parameter
This method comes from the Revit IFC manual. The key here is that this approach is the most flexible of the three listed in this article, allowing for increased configurability. Additionally, this approach enables the IFC classification to be changed per Revit Family Type or even Instance, single element if so desired. Though we’re not sure why you’d need to change the IFC classification of Revit Family Instances as opposed to Revit Family Types, the option is there.
Revit has a hidden feature, where these changes to IFC classification are made by adding parameters with specific naming. The main one is the IfcExportAs, as it sets the class. However, there are other options such as IfcExportType, IfcName, etc. As shown in the manual, the IfcExportType can be combined with the IfcExportAs parameter by structuring the value entered such as this: IfcSlab.ROOF, where dot symbol . is separating the class and type.
For the purpose of standardization and proper templating, a good way to integrate those parameters would be through Shared Parameters, either by including the required IFC parameters into your current shared parameters file or creating a new one. This way, the parameter will have the same GUID value wherever you use it, that can be useful for some Dynamo or Revit API stuff later on. Again, it is important to spell the parameter name correctly. Under discipline, it should be best set to common and the type must be set to Text. After the parameter is created, it remains up to you whether to include it individually in distinct loadable families or just add it to entire categories through Revit Project Parameters. The user would then just need to enter the correct IFC class as the value for this parameter for the element in question and that’s it.
Setting it up as a shared parameter is not a requirement, it can be just a Project Parameter or a Generic Family Parameter. We’d also advise grouping the parameter under IFC Parameters in Revit.

Spelling is crucial, if it is not correct, the override will not be applied when exporting.
These parameters are considered more important to Revit than the IFC export settings, thus changes made with the IfcExportAs parameter will override any settings in the former.
As of writing this article, some families cannot be easily overridden through the IfcExportAs parameter, like system families, walls. It is best to try out the process yourselves to see what works and what doesn’t with your models. If proper modelling practices are used for Revit, many of the issues should be avoided.
Depending on the situation and requirements, the IFC classification change might not be sufficient and IFC property sets might have to be considered as well. This is a different topic regarding parameter mapping that we won’t get into here but might cover it in the future.
3. Using BIM Interoperability Tools to change the IFC classification
The last way to change IFC classes discussed here requires the Autodesk BIM Interoperability Tools to be installed. You can grab them from the website http://www.biminteroperabilitytools.com/. The one you need is the Classification Manager for Revit, though we’d recommend trying out the others as well.
Once installed, a new ribbon will appear in Revit. Under this ribbon, there will be two large buttons, Setup and Assign. Initially what you’d want to do is click the Setup and select a classification library you’d like to use. There are several available already, but it gives the user the option to select browse for a custom one.
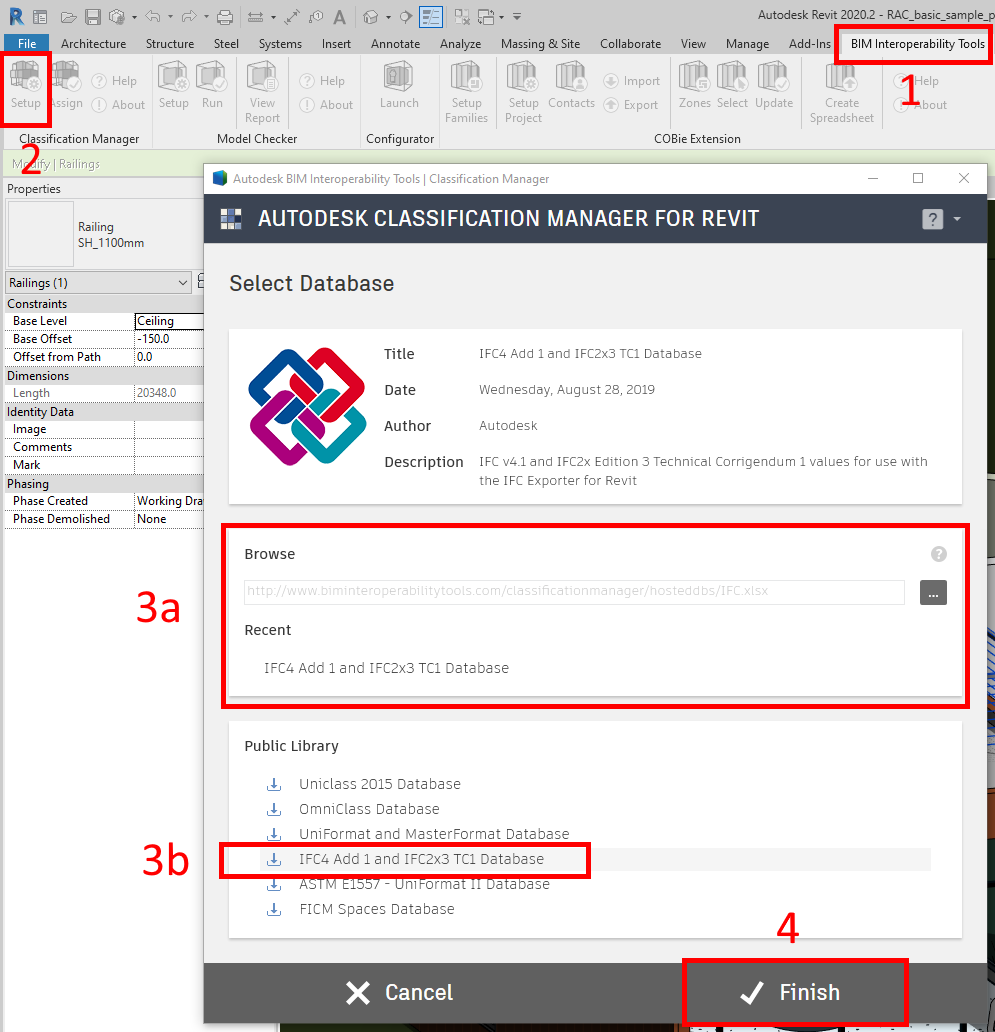
Afterwards, the process is relatively simple, you would navigate to a view in Revit where you can see the element for which the IFC classification has to be changed. From the same ribbon, clicking Assign will launch the tool with the loaded classification library.


For visualization, we’ve loaded up the architectural Revit sample model that comes with the installation and we’ll zoom in on the hanging fireplace in that model.
When we select an element in Revit, the Classification Manager will display a window such as below. In this case, we’ve selected the fireplace and chimney combo. Then, the tab is selected on the left, corresponding to the element. Within that side tab, where will be two tabs for IFC, the IFC4.1 and IFC2X3. A search and filter fields are available to quickly find the classification you want. Then the class matching your filter and search will be shown below. Select it and then hit Assign.

And that is it, very simple fast way to alter the IFC classes for Revit Families. One thing to note though is that what the tool does is basically the same as the process described in the Revit IFC manual. It creates an IfcExportAs parameter and applies the appropriate value to it.

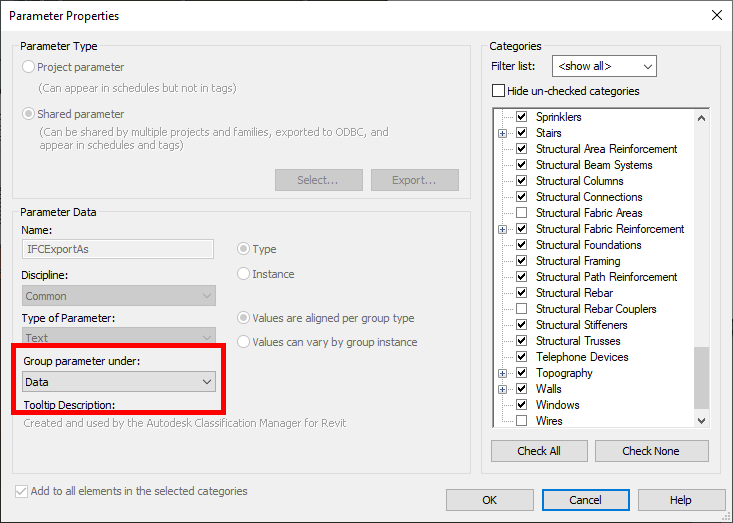
One thing that you might not like is the fact it groups the parameter under Data for some reason. Luckily that can easily be changed from the Project Parameters, selecting Parameter Properties and switching the field to IFC Parameters. And while you’re at it, the categories can be tweaked as well to which the parameter is applied to. Notice that the created IfcExportAs parameter is by default applied as a Type parameter, while generally not a problem, unless, for whatever reason, we can’t think of, you’d want to classify multiple instances of the same Revit object as being different things.
Summing up
In conclusion, there are a few ways to change the IFC classification for Revit
elements. For simplicity, the BIM Interoperability Tools are a great option.
However, for flexibility, the manually inserted parameter route would be best. While
not discussed, consider that visual programming frameworks such as Dynamo can
further enhance the Revit IFC workflow, particularly when dealing with IFC
property sets.
We highly recommend reading the Revit IFC manual if you often work with IFC files and haven’t already done so.
Revit and IFC related links
Link 1: Revit IFC manual
Link 2: IFC 2×3 Documentation
Link 3: IFC 4.1 Documentation
Link 4: IFC certified software
Link 5: Autodesk knowledge network page on Revit supported IFC classes
Link 6: Autodesk BIM interoperability tools
Link 7: Useful IFC links by Autodesk